

stevegt6
-
Posts
178 -
Joined
-
Last visited
Never
Content Type
Forums
Blogs
Events
Downloads
Gallery
Membership & Shop
Posts posted by stevegt6
-
-
Yes.... Neither of the 2 sets of seals, and they were different to each other, had any way of filling or covering those 'slots' at each end of the door. I also had to trim a small amount off lengthwise along the 1/4light part, just so it looked a bit neater against the 1/4light.
Yes, VERY tight in between.... The last clip I have is just before the 1/4light as couldn't get another one on.
When I wash the GT, you can see the water pours down these 'slots' and into the door - which is not ideal to say the least, hence why I waxed the inside and the mechanism in there to death, and made sure the water is free to flow out the bottom.
Could use clear sealant I suppose, but far from ideal. -
The rubber strip which points down inside the door should have moulded rectangular depressions (the rubber strip is thinner) at about 5 or 6 places equally spaced along its length - makes it a bit easier 🤔 to get the clips on.
I think the only thing that 'fitted straight on' on my build were the wheels 😀
PS - I am most definitely not taking one of the seals off to show the moulded depressions
-
The rubber strip which points down inside the door should have moulded rectangular depressions (the rubber strip is thinner) at about 5 or 6 places equally spaced along its length - makes it a bit easier 🤔 to get the clips on.
I think the only thing that 'fitted straight on' on my build were the wheels 😀
PS - I am most definitely not taking one of the seals off to show the moulded depressions -
First set i got came from 'the brothers' - I wasn't sure of them comparing against the old ones, so ordered a set from CC's....which were more like the old ones and the inner ones were nice and velour like.
Both the sets had moulded depressions for where the clips go...
I did have to do a bit of minor trimming around the 1/4light, and both ends have a 'hole' which the seals will never cover or seal..... I have just made sure rain / water can escape easily at the bottom and the insides of the door were waxed to death.
I might do them again sometime, see if can get it better, but they will do for now
Top tip - dont use your 3/8ths ratchet handle to apply downward force on the seal whilst pulling up with the tool........you end up with a 3 inch gouge in your door paint 🤔
🤔 
-
First set i got came from 'the brothers' - I wasn't sure of them comparing against the old ones, so ordered a set from CC's....which were more like the old ones and the inner ones were nice and velour like.
Both the sets had moulded depressions for where the clips go...
I did have to do a bit of minor trimming around the 1/4light, and both ends have a 'hole' which the seals will never cover or seal..... I have just made sure rain / water can escape easily at the bottom and the insides of the door were waxed to death.
I might do them again sometime, see if can get it better, but they will do for now
Top tip - dont use your 3/8ths ratchet handle to apply downward force on the seal whilst pulling up with the tool........you end up with a 3 inch gouge in your door paint 🤔 -
Mind you, when you start splitting up circuits and adding fuses for individual functions, you find that even 24 aren't enough
Errrr..... I can't even name 24 electrical items on my GT6 😀 ....Get close if start to split front/rear and left/right, but a bit extreme I think having 5 fuses for your indicators
-
Don't use ordinary Evostick, you need a high temperature contact adhesive.
Why..?
Evostik 'Timebond' is what I used - Gives that little bit of initial 'give' to make sure it's right before it's cured -
As sparky suggests, if you have not tried manually adjusting (rotating) the dizzy, then absolutely try this - I suspect closer to 10 or so degrees.
Sounds like cam is adjusted pretty well, but I'm no expert here 😀 -
Liking that Nick - Idea of 'live' and 'switched' bussbars 😎
Could be the distant notions of an upgrade to mine on the horizon
-
Vehicle wiring products - they have good stuff
Car builder solutions
Ebay - generally find the same stuff cheaper
I have 2 identical 'marine' spec fuse boxes from 2 different sources at 2 very different prices - and they are identical....same code numbers on them etc...
Recommend swapping out for upgrade to blade fuses and increase the number of fused circuits.
I have seen some neat internal upgrades on here, as well as in the standard location - which is what I opted for. -
How does the mis-fire behave - Does it get worse with higher revs or load..?
Fuel flow...? Carbs adjusted..?
Is cam a tooth or two out..?
Is the spark good from dizzy to all plugs..?
Free air flow..?
When I rebuilt my engine, I pretty much had the same stuff done - pistons/rings/crank/cam/dizzy/carbs(SU's)/all elec side etc... My mistake was the camshaft - I fitted a uprated fast road one, but in my haste putting things back together, I neglected the need for it to be positioned differently and clearances etc... Needless to say it ran awful to begin with, but once run through all the scenarios etc.. and realised, adjusted it, and it ran sweet 😎
Stick with it, these things end up being something pretty simple that we over look - Keep the updates coming, someone here, if not you will get it 🙂 -
Had the pleasure of a quick nosey on saturday at a MK2 which had a very nice install of a Rover V8 mated to a LT77. Phone was not available for photos.....maybe next time.
It was all very nicely done - no chassis mods or any other external mods to give it away......only when the key was turned 😎
-
Concur with Dannyb
Off
Side
Side+dipped -
Mine sounds similar to JB's - Just got the one support member which bolts to welded brackets with captive (welded) nuts...and looks very factory...
-
I have a MK3 version on the shelf - Welcome to borrow it for reference etc.... Don't know how much different from the MK2's.....Probably enough to be useless, and, I guess it depends where you are... I'm around Lancashire....
-
They look pretty good - a bit less obvious than the big cans on mine.... Look forward to seeing the end result
-
Hmmm......that pic is bigger than i thought it was going to be lol
-
Was thinking more about room for a 'tunnel' type thing if you were shoving it up in the boot...
Here's a pic of the twin pipes on mine - the the regular stainless sports system supplied by most - Don't have any issues with ground clearance unless really going some on an uneven road or an unseen small hump back bridge over a canal 😉 but just get few sparks and a little bit shaved off the metal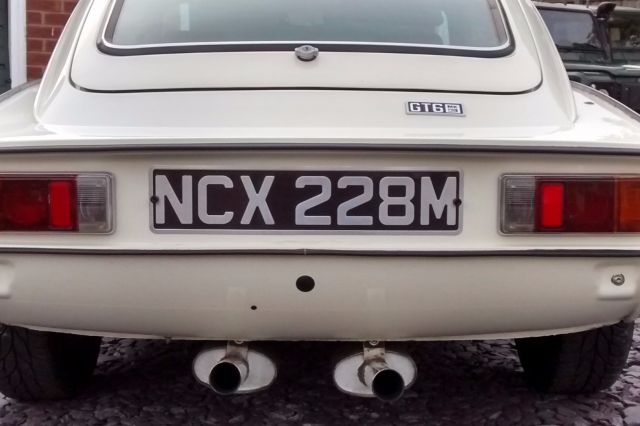
-
Fuel tank might be an issue..?
-
On my mk3, the PO (or garage?) had used the standard clips, but also filled the finishers with clear silicone sealant. Car was in my garage for a decade before rebuild and they were stuck like you know what to a blanket..... So despite being careful, they were too badly deformed to use again.
The sealant worked well though in terms of protection - no sign of rust etc on any of the finishers.
I have only refitted the rear wing finishers, and adopted same method as PO - although I do wonder if I should have adopted a different route.....will find out eventually I suppose. Like the idea of the plastic clips.
On the tail, I have fitted a plastic trim with satin finish. Single length so only one joint - Not original, but works well, and looks good.
That's one of the nice things about the 1's and 2's - not having those top and bottom plus horse-shoe finishers. -
Lol....shows what I know 😀
-
Well, thought it right to update this thread....
I have now fitted carpet set and have very nice re-built seats 😎
After 2 tries with non-moulded - both sets had to be returned anyhow, as they both had mistakes on one or more pieces, I fitted the Newton Commercial moulded set.
Took me a day and a half at a nice pace, including backing felt all over except under seats and footwell - they just have the dyna-mat stuff. There was a bit of trimming to be done, which was okay and expected.
The end result I am happy with. The backing felt gives it some feeling of thickness - which is nice 🙂
All the pieces fitted very well.
Not 100% happy with the standing seam trim cover to the small rear bulkhead - I am thinking of removing it, and buying another length of trim of my own to suit a wider fitting.
Much much quieter in the cockpit now, and quite a bit cooler too, than the 'club sport' spec I had been running
I'll post a pic or two - I know how we all like a pic or two 🙂 -
I suspect it would crack/flake/peel given the heat - I have one of those finned aluminium ones, and that does get pretty hot... I'm no expert, jmo
You could get it anodised - assuming yours is also aluminium -
GT6 should be toasty inside.
Is the heater not blowing hot air?
Fan doing a decent job?
Any drafts blowing through the cabin?
Agree with Clive...
Most of us are looking for ways to make the cabin cooler
gt6 door glass window seal
in Body
Posted
Yes.... Neither of the 2 sets of seals, and they were different to each other, had any way of filling or covering those 'slots' at each end of the door. I also had to trim a small amount off lengthwise along the 1/4light part, just so it looked a bit neater against the 1/4light.
Yes, VERY tight in between.... The last clip I have is just before the 1/4light as couldn't get another one on.
When I wash the GT, you can see the water pours down these 'slots' and into the door - which is not ideal to say the least, hence why I waxed the inside and the mechanism in there to death, and made sure the water is free to flow out the bottom.
Could use clear sealant I suppose, but far from ideal.